It is with an improbable string of warm sunny days that we
conclude work on OneLove. All that is left is to finish up paint and
insulation as well as protect the boat for the 20 months it will spend without
us. We are leaving for Florida on the 16th
of October; With 6 days to close up the cabin, the boat and to generally prepare
our departure, work on the boat has to be completed by the 8th. Intense days ahead…
Once the frames are varnished and ready to
install, we move on to the insulation in the salon. The problem is to properly fasten the frames
in place, without them being mechanically joined to the windows or the steel
structure of the boat, as well as to be readily removable for inspection or
repair. In the salon, unlike on the
overhead, the insulation has to follow
precisely the contour of the frames.
After much pondering, the best idea seems to be to anchor the frames to
small cedar blocks all around their perimeter, using screws inserted at 45°. This way the frames can be removed and
reinserted at will, just by taking out the screws. Part of the challenge is to make a system
that is solid enough to withstand the weight of the frames, some of which are
in excess of 40lbs.

We
try one and the result is conclusive: We
first cover the frame with wax paper, then screw the cedar blocks around
it. We clamp the frame in place and
proceed with insulating using the same technique of sheets and can, making sure
we fill any void around the block, especially in the back, between them and the
steel. When everything is dry and cured,
we unscrew and remove the frame, to get rid of the wax paper, clean up and
even-out the insulation as well as to slap a coat of latex paint on it, to act
as fire retardant and to prevent it from retaining odors, one of the known vices of sprayed insulation.
In order to do all this, we need to cover the
whole salon in plastic tarp, the canned foam is messy and the whole shebang
creates an ungodly mess, especially when removing the excess insulation with a
knife.
The
process takes more than 3 days but what a pleasure to see the nice varnished
frames back in place in their insulation beds.
And what a contrast with the cold shower that befell us last year when
we had to tear it all apart. It is one
big step completed: we’re almost back at the starting point, aesthetically.
The overhead frames present the same dilemma: They need to
stay in place, be removable and free of mechanical lien to the hatches or the
steel structure. The nice local hardware
store owner suggests using silicone sealant.
It is not technically glue but used proficiently, it will hold the frame
in place. Should we need to remove it,
pulling gently should result in the silicone giving, not the varnish or worse,
the frame itself: It proves successful. With the job completed, we will be able to
reinstall the overhead before we leave.
That’s great news, like a little Redbull for the soul!
Amongst
these jobs we also have to conclude the paint
folder. 3 gallons of epoxy primer and 15
coats in the centerboard trunk later, we apply a coat of two-part polyurethane
on all exterior painted surfaces, to protect them from the UVs.
Then we can
reassemble the trunk lid, the interior joinery and the nav station instrument
panel. That completes the projects for
this season; All that is left is to prepare the boat for the harsh winter to
come.
Quicker said than done: it takes more than 8 hours of vacuuming to thoroughly
clean up the interior and deck, there is leftover sanding dust everywhere. Temporary reinstall of the acrylic salon
windows, sealed with gaffer tape. The
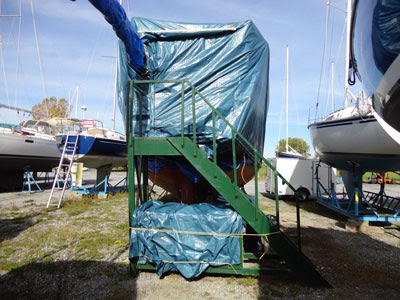
assembly of a semi-rigid roof system over the cockpit is next; we took the
decision to forego shrink-wrap this time around. First, the boat doesn’t need it, being now
almost watertight, second because it is much cheaper to put layup good quality
tarps over the boat than to shrink-wrap it.
Leaving
last year’s wrap over the cabin and foredeck, there will be 4 layers there and
3 over the cockpit. Complete with a
smaller tarp directly over the cabin and the old plexi …there will be no water in this boat.
2 days
later, check.
Then
we decide to leave the cushions in the boat as opposed to the trailer; they’ll
have better aeration.
We pile them up in the salon, leaving a gap all around for
air flow and a sheet over them for dust and mildew. Then we put away the tools and protect the exterior
stairs and workbench.
D-O-N-E
What a piece of work.
Then
we pull the trailer to Grandpa’s house.
The spot where it will be stored is prepared, concrete blocks laid down,
the trailer is emptied to be rolled back there empty, filled up again, the
wheels removed to protect the tires from the sun, everything greasable greased
and a tar slung over it.
In
the foreground in the picture, you can see Grandpa’s Nacra F18II. The apple didn’t fall far from the tree…
It is from a hotel room in Taiwan that we write this last
post for 2013. Work is all one and OneLove is ready for all that a Canadian
winter can throw at it. While we are abroad
for work until June 2015, we’ll finish filling up the cruising kitty, all the
while taking the time to find her a new name and color. Then one more summer of
work and we’ll splash her. After that,
the sky’s the limit…
Thanks for following us this summer. We wish you fair winds, perseverance and
success in your endeavors and mostly your dreams and we invite you back around
the summer of 2015.
JF, Shannan, Joshua and Benjamin.